Vendor Management
Vendor Management
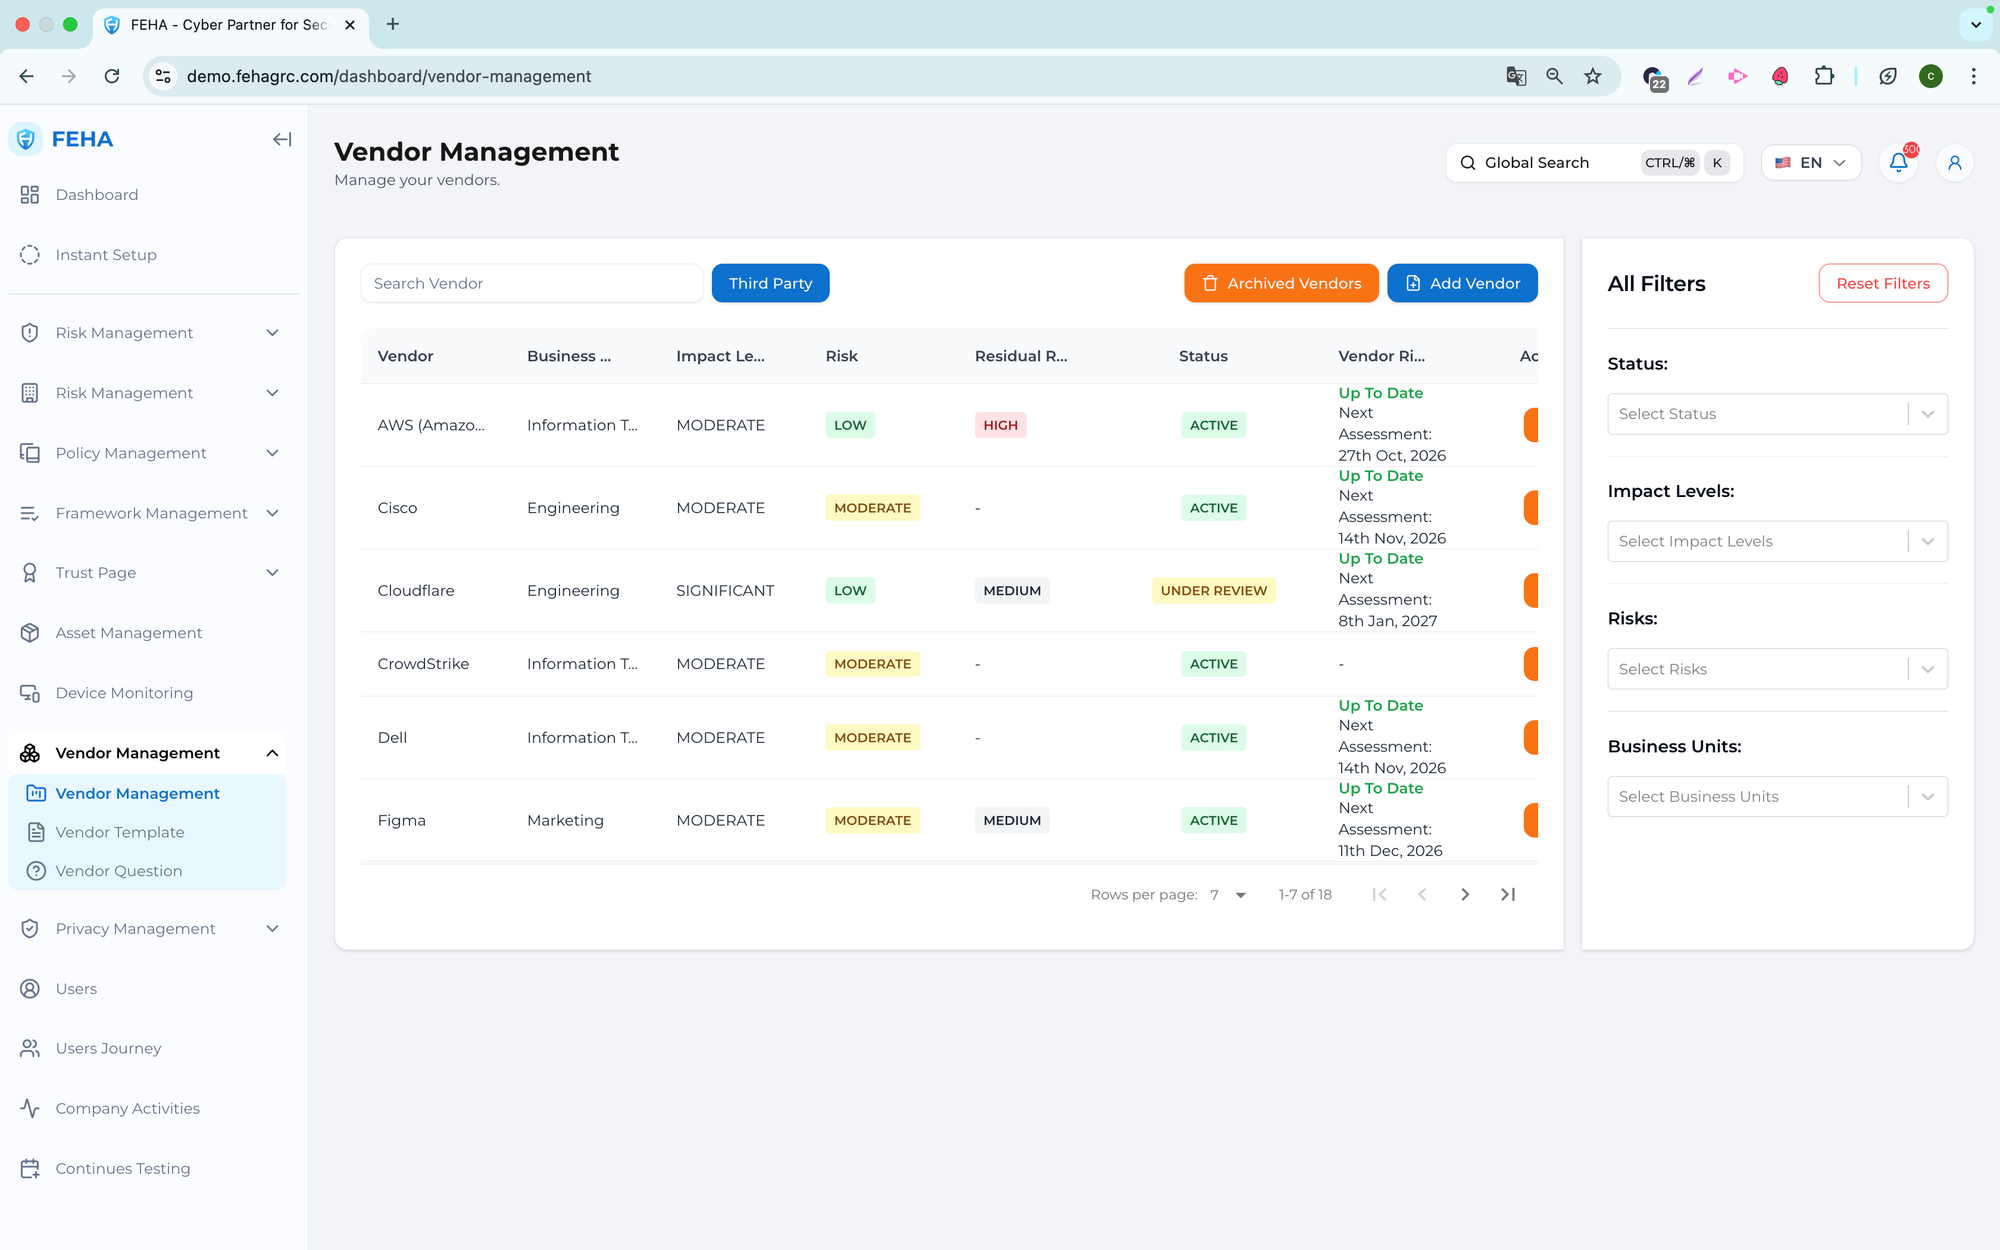
The Vendor Management menu centralizes third-party vendor oversight, including security and risk activities. It provides access to vendor records, integrations, risk assessments, and activity logs.
Searching Vendors
This case explains how to search for a specific vendor.
- Open the Vendor Management page.
- Select the Search Vendor field.
- Enter the vendor name or keyword.
- Review the list of matching vendors.
Filtering Vendors
Follow these steps to filter the vendor list.
- Open the Vendor Management page.
- Choose filter criteria as needed.
- Review the list of vendors that match the selected criteria.
Adding a Vendor
Follow these steps to add a new vendor.
- Open the Vendor Management page.
- Select Add Vendor.
- Complete the vendor form with the required information.
- Select Add Vendor to save.
Updating a Vendor
Follow these steps to update an existing vendor.
- Open the Vendor Management page.
- Select the vendor you want to update.
- Update the vendor information as needed.
- Select Update Vendor to save your changes.
Archiving a Vendor
Follow these steps to archive a vendor.
- Open the Vendor Management page.
- Select Delete for the vendor you want to archive.
- Confirm the action in the confirmation dialog.
Note: Archived vendors are removed from active lists.
Vendor Integration
This case explains how to integrate a vendor with supported services.
- Open the Vendor Management page.
- Select the vendor you want to integrate.
- Open the Integration section.
- Enter the required integration details.
- Select Save.
- Wait for the integration process to complete.
- Review the completed scans.
Note: Integration progress depends on external systems.
Adding a Vendor Risk Assessment
Follow these steps to create a new vendor risk assessment.
- Open the Vendor Management page.
- Select the vendor for assessment.
- Open the Vendor Risk Assessment section.
- Select Add New Vendor Risk Assessment.
- Choose a question group.
- Select Continue.
Deleting a Vendor Risk Assessment
Follow these steps to delete a vendor risk assessment.
- Open the Vendor Management page.
- Select the vendor with the assessment to delete.
- Open the Vendor Risk Assessment section.
- Select Delete for the assessment you want to remove.
- Confirm the deletion when prompted.
Viewing Vendor Risk Assessment Reports
Follow these steps to view assessment reports.
- Open the Vendor Management page.
- Select the relevant vendor row.
- Open the Vendor Risk Assessment section.
- Select View on the relevant assessment row.
- Review the PDF preview of the assessment report.
Uploading a Vendor Risk Assessment
Follow these steps to upload an assessment file.
- Open the Vendor Management page.
- Select the vendor for the assessment upload.
- Open the Vendor Risk Assessment section.
- Select Upload Vendor Risk Assessment.
- Enter the required upload details.
- Select Submit.
Assigning an Assessment Owner
Follow these steps to assign an owner to a vendor risk assessment.
- Open the Vendor Management page.
- Select the vendor for the assessment.
- Open the Vendor Risk Assessment section.
- Select Owner for the desired assessment.
- Select the Search and Select Owner field.
- Choose an owner from the list.
- Select Save Owner.
Sending a Vendor Risk Assessment
Follow these steps to send an assessment to a vendor.
- Open the Vendor Management page.
- Select the vendor to receive the assessment.
- Open the Vendor Risk Assessment section.
- Select Review.
- Select Assign Question.
- Enter the required information.
- Select Send.
Searching Vendor Logs
Follow these steps to search vendor activity logs.
- Open the Vendor Management page.
- Select the vendor whose logs you want to search.
- Open the Vendor Log section.
- Select the Search Activities field.
- Enter a keyword.
- Review the list of matching activities.
Filtering Vendor Logs
Follow these steps to filter vendor activity logs.
- Open the Vendor Management page.
- Select the vendor whose logs you want to filter.
- Open the Vendor Log section.
- Select Filter.
- Enter the required filter criteria.
- Select Reset Filter if you want to clear the filters.
Vendor Template
The Vendor Template submenu allows you to create vendor records using predefined templates, ensuring consistency and standardized information during vendor onboarding.
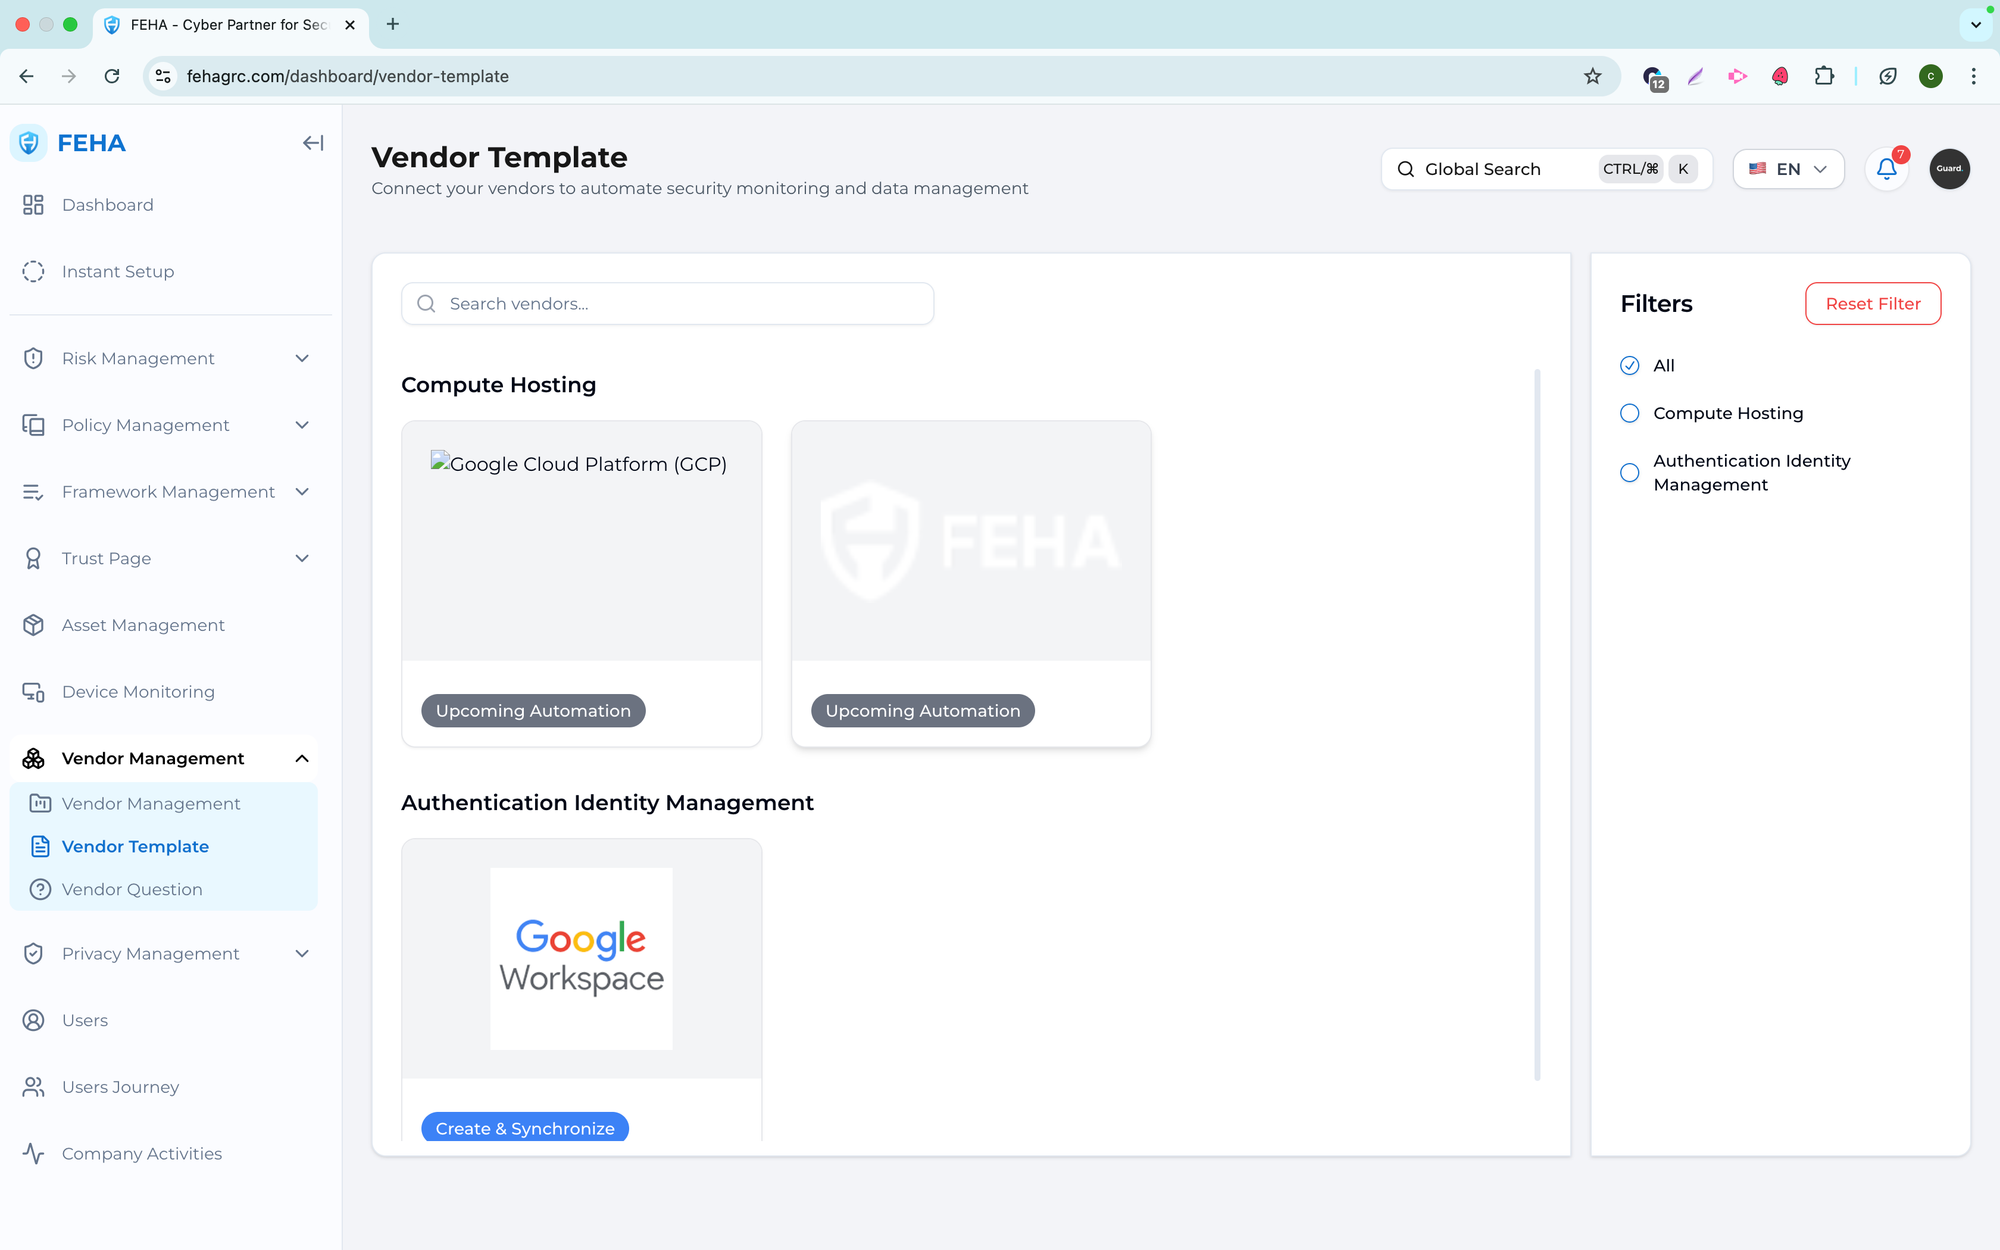
Searching Vendor Templates
This section outlines how to search for a specific vendor template.
- Open the Vendor Template page.
- Select the Search Vendor field.
- Enter the vendor name or keyword.
- Review the list of vendor templates that match your search.
Filtering Vendor Templates
This section explains how to filter vendor templates using available criteria.
- Open the Vendor Template page.
- Select the desired filter values.
- Review the list of vendor templates that meet your selected criteria.
Adding a New Vendor from a Template
This section explains how to create a vendor using a vendor template.
- Open the Vendor Template page.
- Select the desired vendor template.
- Complete the vendor form with all required information.
- Select Add Vendor to create the new vendor record.
Note: Vendor templates promote consistency and minimize manual data entry when creating vendors.
Vendor Question
The Vendor Question submenu is used to manage question structures for vendor risk assessments. It supports the creation and organization of categories, groups, and questions to ensure consistent and structured assessments.
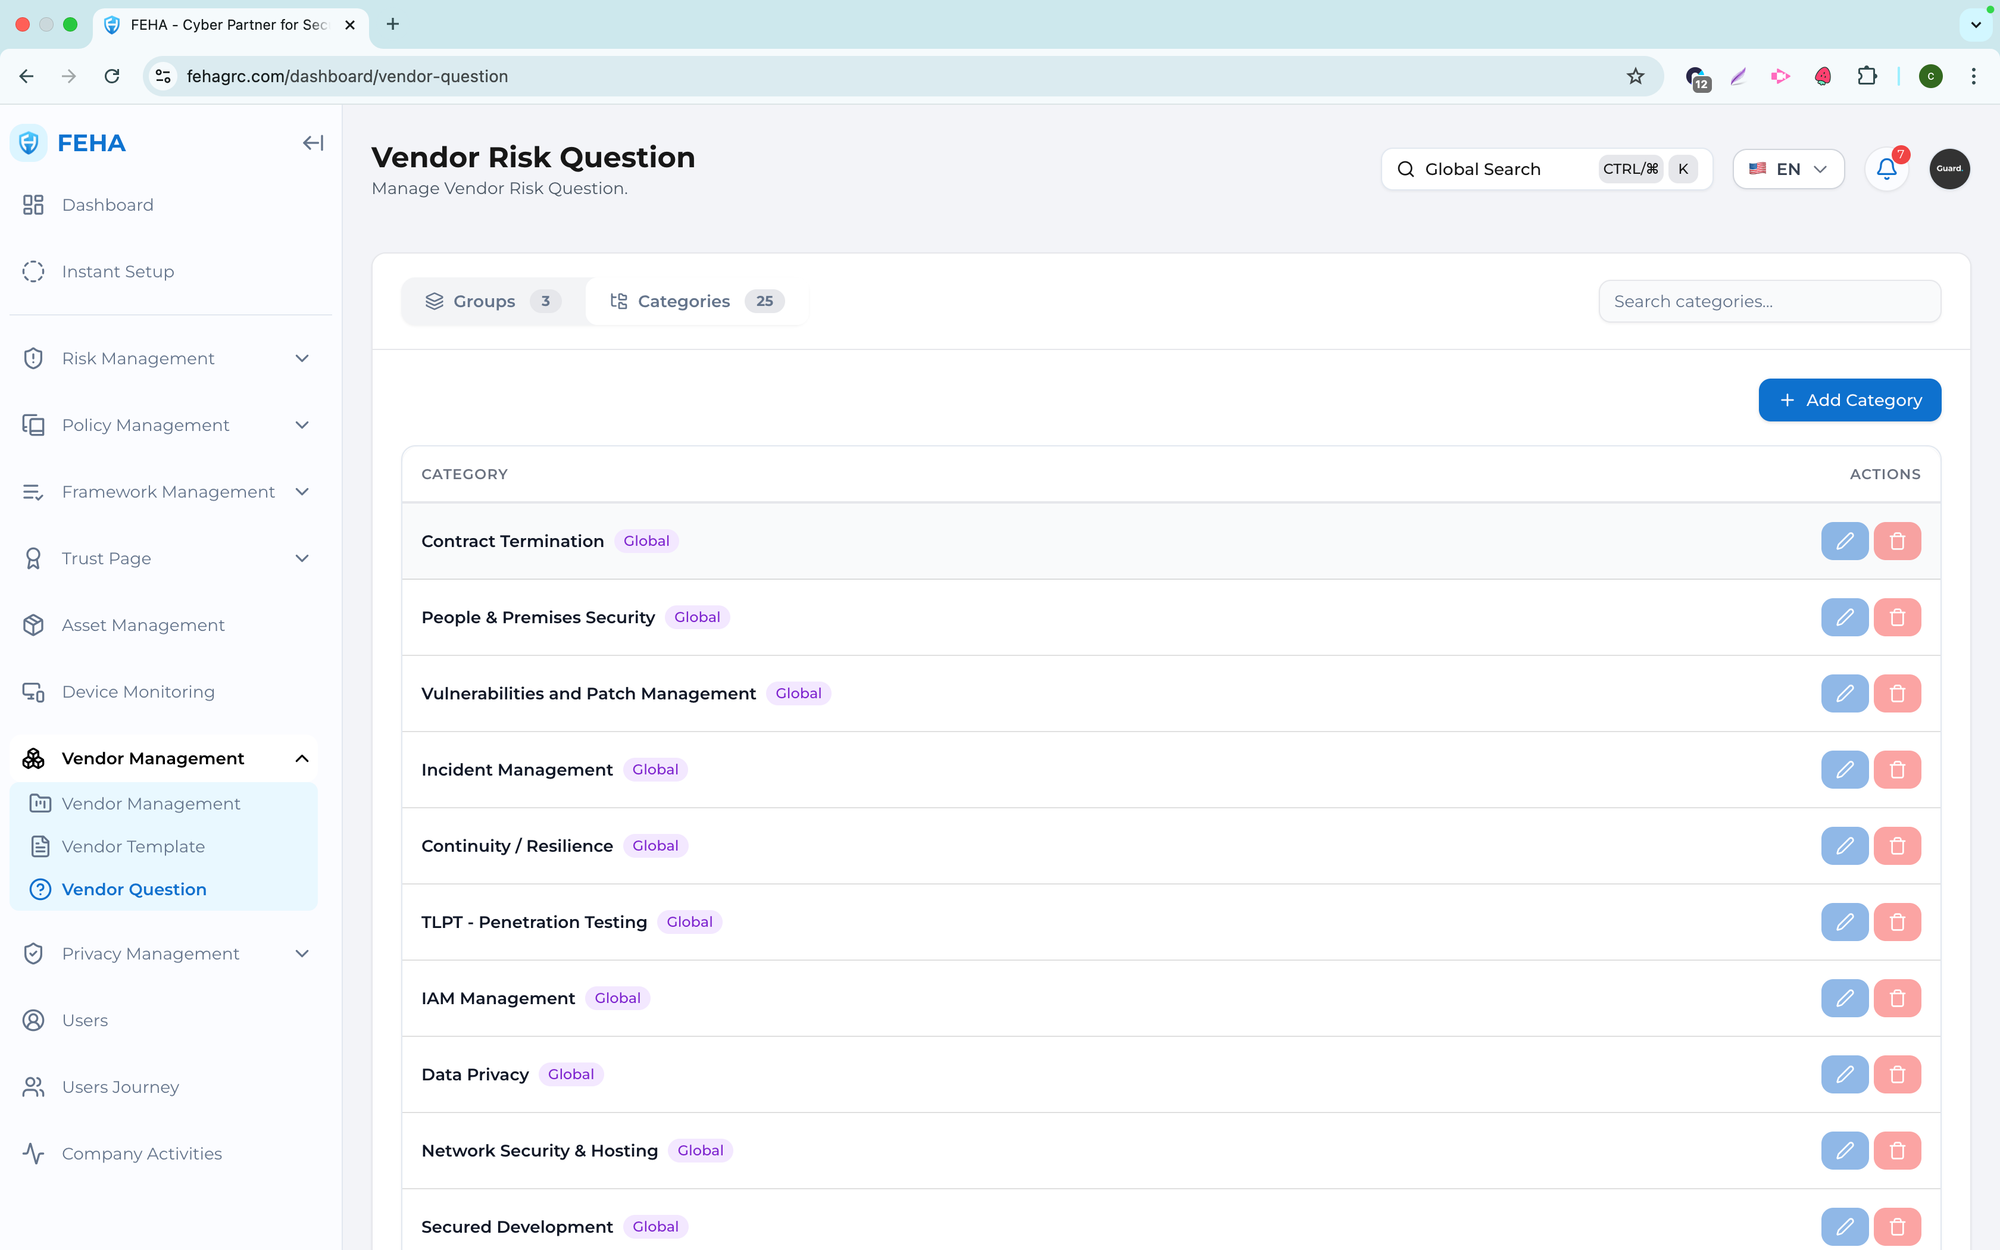
Adding a Question Category
To add a new question category, follow these steps.
- Open the Vendor Question page.
- Open the Categories section.
- Select Add Category.
- Complete the category form.
- Select Create Category.
Editing a Question Category
To update an existing question category, follow these steps.
- Open the Vendor Question page.
- Open the Categories section.
- Select Edit on the relevant category row.
- Update the category information.
- Select Update Category.
Deleting a Question Category
To remove a question category, follow these steps.
- Open the Vendor Question page.
- Open the Categories section.
- Select Delete on the relevant category row.
- Confirm the deletion.
Note: Deleted categories cannot be recovered.
Searching Question Categories
To search for question categories, follow these steps.
- Open the Vendor Question page.
- Open the Categories section.
- Select the Search field.
- Enter a keyword.
- Review the list of matching categories.
Adding a Question Group
To add a new question group, follow these steps.
- Open the Vendor Question page.
- Open the Groups section.
- Select Add Group.
- Complete the group form.
- Select Create Group.
Deleting a Question Group
To delete a question group, follow these steps.
- Open the Vendor Question page.
- Open the Groups section.
- Select Delete on the relevant group row.
- Confirm the deletion.
Editing a Question Group
To update a question group name, follow these steps.
- Open the Vendor Question page.
- Open the Groups section.
- Select Edit on the relevant group row.
- Update the group name.
- Select Update Group.
Searching Question Groups
To search for question groups, follow these steps.
- Open the Vendor Question page.
- Open the Groups section.
- Select the Search Groups field.
- Enter a keyword.
- Review the list of matching groups.
Adding a Question to a Group
To add a question to a group, follow these steps.
- Open the Vendor Question page.
- Open the Groups section.
- Select View on the relevant group row.
- Select Add Question.
- Complete the question form.
- Select Create Question.
Deleting a Question from a Group
To remove a question from a group, follow these steps.
- Open the Vendor Question page.
- Open the Groups section.
- Select View on the relevant group row.
- Select Delete on the relevant question row.
- Confirm the deletion.
Editing a Question in a Group
This case explains how to update an existing question.
- Open the Vendor Question page.
- Open the Groups section.
- Select View on the relevant group row.
- Select Edit on the relevant question row.
- Update the question information.
- Select Update Question.
Reordering Questions in a Group
This case explains how to reorder questions.
- Open the Vendor Question page.
- Open the Groups section.
- Select View on the relevant group row.
- Select and drag the reorder handle on the question row.
- Drop the question in the desired position.
Searching Questions in a Group
To search for questions within a group, follow these steps.
- Open the Vendor Question page.
- Open the Groups section.
- Select View on the relevant group row.
- Select the Search field.
- Enter a keyword.
- Review the list of matching questions.